 ); ?>/images/fb.png)
 ); ?>/images/twitter.png)
 ); ?>/images/google_plus.png)


By Richard Bunn
As most seasoned auto locksmiths will know profitable jobs such as Fiats and Toyotas involve working with an EEPROM or two in order to create a transponder key for a customer (when all keys have been lost or stolen). What I will show is the other side to that job – where customers not only need a NEW key but also need all the locks changing on the vehicle.
Locksmiths have short cuts in this situation and can either buy a new lockset on behalf of the customer to fit to the vehicle, or alternatively the vehicles existing locks can be re-combinated in order to give the customer a key with a different bitting.
This article will start with the ‘sometimes’ unknown basics of how to strip out each lock from the vehicle, giving you, the locksmith, the choice to then fit new or re-combinate the existing locks.

The customer had been quoted £1200 to have new keys and the lockset changed on his Fiat Doblo by the main dealer. So it’s definitely worth learning both how to do EEPROM work (TANGO and Orange5) as well as stripping and changing locks.
The Door Locks
The door locks are not removable by the traditional torx screw situated in the side of the door. You need to start by taking the complete door card off. This is due to the door lock being held in position with bolts that are situated inside the door card.
STEP 1:
You first start by removing the side mirror trim that contains both a speaker and an adjustment stick for the external side mirror; once removed this will allow that side of the door card to come off without any obstruction. Ensure you use a wide trim tool to guarantee there are no breaks or stress marks on the plastic


STEP 2:
Now remove, from the door card, the handle and window mechanism. This has two black covers.
where underneath you will find two torq bolts. Once both of these bolts have been removed you can lift the complete mechanism up and out of the recess.
You will notice that the door cable needs removing before it can be completely detached. This is a simple hook and catch which needs unclipping from the mechansim.
STEP 3:
Now you are ready to safely remove the main body of the door card. Firstly, remove the torx bolt situated where the window/ door mechanism was seated. After this bolt has been removed the rest of the door card is held by the standard plastic ‘push’ trim clips.
Gently using your trim tool ‘pop’ the door card carefully away from the metal door frame. Be careful to put the door card down in an area that will stop it from being damaged (they are expensive to replace).
STEP 4:
Now remove the rubber bungs on the side of the door – you can access the torx bolts below which both need removing.
STEP 5:
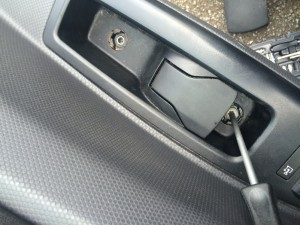
Now remove the cover and you will find underneath the door locking mechanism and lock assembly.

STEP 6:
With the lock now removed you are able to access the plug to either re-combinate or alternatively fit a new door lock.
STEP 7:
To remove the plug from the housing, unclip the black plastic mechanism as shown previously, and then remove the U clip from the body of the housing which finally releases the plug.

STEP 8:
With the door locks now changed on both sides (on this Fiat Doblo model), you can now focus on the infamous petrol cap and glove box locks.
The petrol cap body disassembles from the front of the cap. Use a 5mm screwdriver to start the process off – the action is like using a ‘tin opener’ as you run the screwdriver round the inside seam – but watch your hands!
It is constructed with small plastic locking tabs that keep the body fitted into the front cap. This means no more push on petrol caps for your customers.

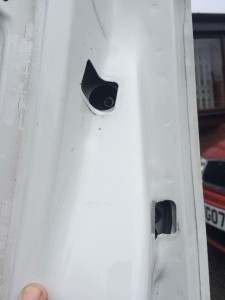
STEP 9:
With the assembly removed you now have to remove the remaining U clip and the plug will be accessible for changing.
STEP 10:
The glove box is often over looked and not changed by customers as they can be picked open and then left as is – however it is easy to change the glove box lock. There is a small circlip on the back of the glove box; you can move the circlip a couple of mm backwards and this will release the plug straight out the front. When the plug is then replaced it speeds up the process of locating the circlip, remember then to push the circlip back into position.
When new to lockset changes this type of job can be naturally quite daunting and unattractive however this guide is intended to give you some understanding and direction when taking on such a task for the first time.
With the need now to maximise every job we get these days it’s more profitable to say yes not just to the ‘quick’ diagnostic side but also the slower lockset change. This type of lockset change with some practise can be done in as little as an hour and gives the auto locksmith a greater earning potential from every ‘lost or stolen’ key situation.
TIP: Don’t forget to take pictures as you do each job – this keeps as a useful future record of a ‘how to do’ for that vehicle plus it is invaluable if your job starts to go wrong as you now have a useful ‘before’ reference.